微信阅读网页版实现的初步尝试
前言
最近用微信阅读网页版时突然想到的。看了源代码,因为压缩了并没有看出什么有价值的东西。于是自己尝试了一下如何实现。
不知道微信阅读用的是什么Canvas JS库,我用了自己比较熟悉的FabricJS
主要尝试实现的两点功能:
-
文字自动换行
-
对文字选择划线
成果
这是我尝试的结果:

这是在线体验地址:
实现
帖发一下代码:
index.html
<!DOCTYPE html>
<html lang="en">
<head>
<meta charset="UTF-8">
<meta http-equiv="X-UA-Compatible" content="IE=edge">
<meta name="viewport" content="width=device-width, initial-scale=1.0">
<title>Document</title>
<style>
html,body{
margin: 0;
height: 100%;
overflow: hidden;
}
.canvas{
width: 100vw;
height: 100vh;
}
</style>
<script src="./fabric.min.js"></script>
<script src="./Reader.js"></script>
</head>
<body>
<button onclick="handleMark()">马克笔</button>
<canvas id="canvas" class="canvas"></canvas>
<script>
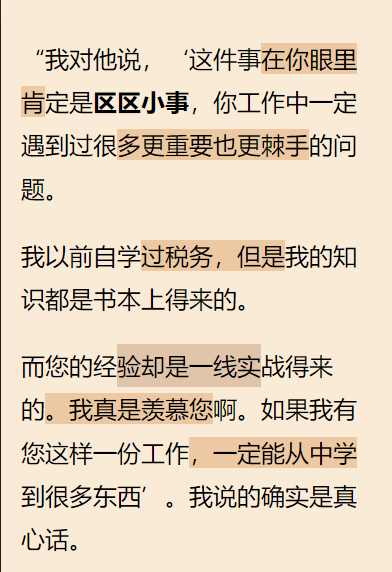
let str = `“我对他说,‘这件事在你眼里肯定是区区小事,你工作中一定遇到过很多更重要也更棘手的问题。我以前自学过税务,但是我的知识都是书本上得来的。而您的经验却是一线实战得来的。我真是羡慕您啊。如果我有您这样一份工作,一定能从中学到很多东西’。我说的确实是真心话。 `
const reader = new Reader(document.querySelector('#canvas'))
reader.setText(str)
function handleMark() {
reader.markSelected()
}
</script>
</body>
</html>Reader.js
class Selector {
  constructor(canvas, options) {
    this.canvas = canvas
    this.options = options ?? {}
    this.isSelecting = false
    this.startIndex = 0
    this.endIndex = 0
    this.rects = []
    this.text = null
  }

  clearSelected() {
    this.rects.forEach(item => {
      this.canvas.remove(item)
    })
  }

  setSelected(text, start, end, conf) {
    conf = conf ?? {}
    const isMark = conf.isMark
    this.text = text
    if (start > end) {
      [start, end] = [end, start]
    }
    this.clearSelected()
    this.endIndex = end
    this.rects = []
    const bounds = text.__charBounds ?? []
    const padding = this.options.padding
    let fillStyle = this.options.selectionColor
    if (isMark) {
      fillStyle = '#ffefc2'
    }
    let index = 0
    let height = padding
    bounds.forEach((bound, row) => {
      bound.forEach((char, col) => {
        index++
        if (index > start && index <= end) {
          let rect = new fabric.Rect({
            left: char.left + padding,
            top: height,
            width: char.width,
            height: char.height,
            fill: fillStyle
          })
          if (!isMark) {
            this.rects.push(rect)
          }
          this.canvas.add(rect)
        }
      })
      index--
      height += text.__lineHeights[row]
    })
    text.bringToFront()
    this.selectedText = text.text.substring(start, end)
    return this
  }

  setMark() {
    this.setSelected(this.text, this.startIndex, this.endIndex, {isMark: true})
  }

}

class Reader {

  constructor(canvas, options) {
    this.options = options ?? {
      padding: 20,
      fontSize: 24,
      lineHeight: 1.4,
      selectionColor: '#d6eeb9',
    }
    this.canvas = new fabric.Canvas(canvas, {
      isDrawingMode: false,
      selection: false,
    })
    this.height = window.innerHeight
    this.width = window.innerWidth
    this.marks = []
    this.init()
  }

  init() {
    this.canvas.setHeight(this.height)
    this.canvas.setWidth(this.width)
    this.selector = new Selector(this.canvas, this.options)
    this.events()
  }

  onSelect() {}

  events() {
    this.canvas.on('mouse:down', e => {
      if (!this.text) return
      const start = this.text.getSelectionStartFromPointer(e.point)
      this.selector.isSelecting = true
      this.selector.startIndex = start
    })
    this.canvas.on('mouse:move', e => {
      if (!this.text) return
      const end = this.text.getSelectionStartFromPointer(e.point)
      if (this.selector.isSelecting) {
        this.selector.setSelected(this.text, this.selector.startIndex, end)
      }
    })
    this.canvas.on('mouse:up', e => {
      if (!this.text) return
      const end = this.text.getSelectionStartFromPointer(e.point)
      if (this.selector.isSelecting) {
        if (this.selector.startIndex === end) {
          this.selector.clearSelected()
        } else {
          this.onSelect && this.onSelect(this.selector)
        }
      }
      this.selector.isSelecting = false
    })
  }

  setText(text) {
    const padding = this.options.padding
    const fontSize = this.options.fontSize
    const lineHeight = this.options.lineHeight
    if (this.text) {
      this.canvas.remove(this.text)
    }
    this.text = new fabric.Textbox(text, {
      fontSize,
      top: padding,
      left: padding,
      width: this.width - padding * 2,
      height: this.height - padding,
      splitByGrapheme: true,
      lineHeight,
      textAlign: "left", // 文字对齐
      baseLine: 'top',
      editable: false,
      hasControls :false,
      selectable :false,
      hoverCursor: 'text',
    })
    this.canvas.add(this.text)
  }

  markSelected() {
    this.selector.setMark()
    this.marks.push({
      start: this.selector.startIndex,
      end: this.selector.endIndex,
      text: this.selector.selectedText
    })
    console.log(this.marks)
  }

}
fabric.min.js
这个Canvas 2D库可以到以下官方网址获取并查看文档
这个Demo很简陋,只是尝试了一个开头。由于没有这个业务需求,知道了如何实现后就没有再继续写了。如果你刚好有这个需要,希望能有抛砖引玉吧。
简要思路
本想直接原生CanvasAPI实现一下,想想属实过去麻烦了。又搜索了下都有什么Canvas的库。也没找到什么合适的。最后还是使用了曾经用过的fabricJS
先要实例化一个fabric画布
this.canvas = new fabric.Canvas(canvas, {
  isDrawingMode: false,
  selection: false,
})我用到了fabric.Textbox 它可以直接实现文字的自动换行。
Textbox本来是可以编辑的,但我需要的并不是直接编辑,而是只能选择并添加划线的效果。所以放弃了它的编辑能力。
this.text = new fabric.Textbox(text, {
  fontSize,
  top: padding,
  left: padding,
  width: this.width - padding * 2,
  height: this.height - padding,
  splitByGrapheme: true,  // 中文换行
  lineHeight,
  textAlign: "left",
  baseLine: 'top',
  editable: false,
  hasControls :false,
  selectable :false,
  hoverCursor: 'text',
})
this.canvas.add(this.text)
Textbox的鼠标事件中可以返回点击到的文字索引。就这给选择与划线提供了可能。
this.canvas.on('mouse:down', e => {
  const start = this.text.getSelectionStartFromPointer(e.point)
})
Textbox.getSelectionStartFromPointer(e.point)方法可以返回点击位置文字的索引
Textbox.__charBounds 属性中存储了每个文字的位置与尺寸信息,Textbox.__lineHeights中存储了每行的行高信息。这样就可以计算出选择划线的位置了。
计算出位置后,在文字后方添加上划线的样式就可以了。
我使用了fabric.Rect方法画出每个选中文字背后的矩形样式,我是逐字画的,性能不好,可以优化。
let rect = new fabric.Rect({
  left: char.left + padding,
  top: height,
  width: char.width,
  height: char.height,
  fill: fillStyle
})
this.canvas.add(rect)
这就是大至的实现过程了。
后记
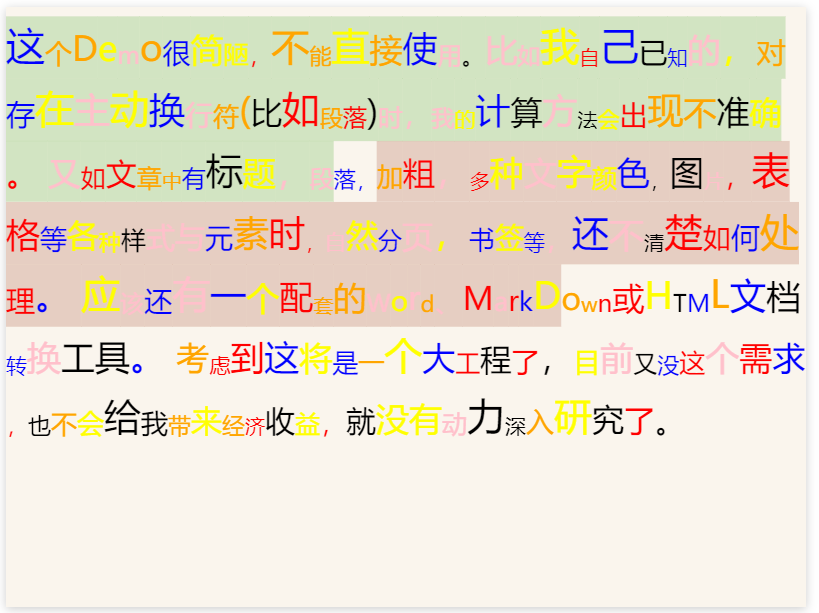
这个Demo很简陋,不能直接使用。比如我自己已知的,对存在主动换行符(比如段落)时,我的计算方法会出现不准确。
又如文章中有标题,段落,加粗,多种文字颜色,图片,表格等各种样式与元素时,自然分页,书签等,还不清楚如何处理。
应该还有一个配套的Word、MarkDown或HTML文档转换工具。
考虑到这将是一个大工程了,目前又没这个需求,也不会给我带来经济收益,就没有动力深入研究了。
当然,我后面又思考,如果直接使用HTML来实现是不是会简单很多。微信阅读使用Canvas实现的原因是什么呢,为了防止爬虫恶意采集吗?不太清楚了。
我又想试试HTML实现了。。。
关于之后我又尝试的HTML实现
不试不知道,一试吓一跳。这坑简直是太多了。。。
这是我的尝试代码:
<!DOCTYPE html>
<html lang="en">
<head>
  <meta charset="UTF-8">
  <meta http-equiv="X-UA-Compatible" content="IE=edge">
  <meta name="viewport" content="width=device-width, initial-scale=1.0">
  <title>Reader by HTML</title>
  <style>
    html,body{
      margin: 0;
      height: 100%;
      overflow: hidden;
    }
    #reader{
      width: 100vw;
      height: 100vh;
      background-color: antiquewhite;
      box-sizing: border-box;
      padding: 20px;
      font-size: 24px;
      line-height: 1.8;
    }
    ::selection{
      background-color: #e0c5ab;
    }
    .mark{
      font-weight: normal;
      background-color: #edc9a3;
    }
  </style>
</head>
<body>
<div id="reader"></div>
<script>
const html = `
<p>“我对他说,‘这件事在你眼里肯定是<strong>区区小事</strong>,你工作中一定遇到过很多更重要也更棘手的问题。</p>
<p>我以前自学过税务,但是我的知识都是书本上得来的。</p>
<p>而您的经验却是一线实战得来的。我真是羡慕您啊。如果我有您这样一份工作,一定能从中学到很多东西’。我说的确实是真心话。</p>
`

class Reader {
  constructor(dom) {
    this.dom = dom
    this.init()
  }

  init() {
    this.dom.addEventListener('mouseup', event => {
      const selection = document.getSelection()
      const range = selection.getRangeAt(0)
      if (range.collapsed) {
        return
      }
      const start = range.startOffset
      const end = range.endOffset
      const endNode = range.startContainer.splitText(start)
      const textNode = document.createElement('b')
      textNode.className = 'mark'
      const currentNode = endNode.splitText(end - start)
      textNode.appendChild(document.createTextNode(selection.toString()))
      selection.anchorNode.parentNode.replaceChild(textNode, currentNode.previousSibling)
    })
  }

  setText(text) {
    this.dom.innerHTML = text
  }

}


const reader = new Reader(document.querySelector('#reader'))
reader.setText(html)

</script>
</body>
</html>
这是在非常之理想条件下的效果(选中的文字不跨节点,不包含子节点):
要解决的问题:
1. 浏览器的选中背景色高度与文字css添加背景高度的不一致,这还只是小问题
2. 最大的问题是,我不知道如何处理跨节点添加节点,比如:我选中了在两个段落中的文字,这时我不知道如何处理node之间的复杂关系。
我试了一下富文本编辑器,他们都能够轻松的完成这个工作,但是我不知道他们是如何实现的。
以下是我这个博客系统编辑文章所使用的富文本编辑器


可以看到,他很轻松的完成了跨节点的选择与加粗。所以结论应该是HTML实现是没问题的,有问题的是我。。
关于这个实现的我的又一次尝试
这一次我直接上了原生canvas,结果怎么说呢,感觉比预期要好一点点。。


参与讨论